Mnogi uporabniki imajo težave, ko Steam ne prenese vašega časa. To vas opozori, da strežniki z vsebinami niso dostopni za prenos. Lahko rečemo, da te težave ne povzroča nobena težava, zlasti zaradi številnih konfiguracij uporabnikov. Našteli smo nekatere rešitve, ki vključujejo vse metode podpore Steam in uporabnikov.

1. rešitev: Odstranjevanje nastavitev proxyja
Proxy strežnik se uporablja v organizacijah, kjer je odprt dostop do interneta omejen. Proxy se uporablja za sledenje omrežju in zagotavlja alternativni prehod za uporabnike. Nastavitve proxyja pogosto postanejo ovira, ko se Steam poskuša povezati s svojimi strežniki za prenos.
Proxyja v računalniku lahko onemogočite na dva načina.
1. način: Chrome
- Odprite brskalnik Chrome in ob odprtju kliknite meni Chrome (zgoraj desno).

- Ko pride spustni meni, kliknite Nastavitve .

- Ko se odpre stran z nastavitvami, v pogovorno vrstico na vrhu vnesite » proxy «.

- Med rezultati iskanja izberite rezultat, na katerem piše » odpri nastavitve proxyja «.

- Ko se nastavitve odprejo, na zavihku Povezave na dnu kliknite » Nastavitve LAN «.

- Počistite potrditveno polje » Samodejno zaznaj nastavitve «. Shranite spremembe in zapustite. Znova zaženite Steam.

2. način: prek omrežnih nastavitev
- Pritisnite gumb Windows + R, da odprete aplikacijo Zaženi.
- V pogovorno okno vnesite »inetcpl. cpl ".

- Odprle se bodo internetne lastnosti. Pomaknite se do zavihka Povezave in kliknite Nastavitve LAN.
- Ko ste v nastavitvah LAN, počistite vrstico z napisom » Samodejno zaznaj nastavitve« . Shranite spremembe in zapustite, da znova zaženete Steam.
2. rešitev: Onemogočanje razširitev za Chrome
Včasih lahko razširitve, ki so prisotne v Chromu, ustvarijo resnično oviro. Motijo vaše omrežne nastavitve, še posebej dodatek z imenom » Ghostery «. Nadzira vaše omrežje in zagotavlja statistične podatke o tem, kje pustite svoj digitalni odtis. Omogoča vam celo nadzor, katera spletna mesta lahko dostopajo do vaših podatkov in katera ne. Pred nadaljevanjem prenosa priporočamo, da te dodatke iz Chroma onemogočite. Če bi težavo povzročili oni, bi jo rešili.
To ne vključuje samo razširitev za Chrome, onemogočite VSAK program, ki je povezan z vašim omrežjem (nadzor podatkov, VPN itd.). Bolje je, da poskusite, namesto da nadaljujete z nadaljnjimi rešitvami, ki so bolj zapletene.

3. rešitev: Spreminjanje regije za prenos
Eden od osnovnih popravkov vključuje spreminjanje regije za prenos.
Sistem vsebine Steam je razdeljen na različne regije. Odjemalec prek vašega omrežja samodejno zazna vašo regijo in jo nastavi kot privzeto. Včasih so strežniki v določenem območju lahko preobremenjeni ali pa imajo okvaro strojne opreme. Tako lahko sprememba regije prenosa reši zadevno težavo. Preden nadaljujete z nadaljnjimi rešitvami, lahko vedno poskusite večkrat spremeniti območja prenosa (ni samo en poskus).
- Odprite Steam in v spustnem meniju v zgornjem levem kotu okna kliknite » Nastavitve «.
- Izberite ' Prenosi ' in se pomaknite do ' Prenesi regijo '.
- Izberite druge regije, ki niso vaše, in znova zaženite Steam.

4. rešitev: Brisanje clientregistry.blob
Vaš odjemalski register v Steamu se lahko poškoduje in to je lahko razlog, da se soočate z napako. Lahko ga poskusimo preimenovati / izbrisati.
- Popolnoma zapustite Steam in končajte vsa opravila, kot je navedeno v zgornji rešitvi.
- Poiščite svoj imenik Steam. Privzeta je C: \ Program Files \ Steam .
- Poiščite ' clientregistry.blob' .

- Datoteko preimenujte v ' clientregistryold.blob ' (ali pa jo lahko popolnoma izbrišete).
- Znova zaženite Steam in dovolite ponovno ustvarjanje datoteke.
Upajmo, da bo vaša stranka delovala po pričakovanjih. Če še vedno ne deluje, sledite spodnjim korakom.
- Pojdite nazaj v svoj imenik Steam.
- Poiščite 'Steamreporter. exe '.

- Zaženite aplikacijo in znova zaženite Steam.
5. rešitev: Počistite čakalno vrsto za prenos v Steam
Če imate v odjemalcu Steam veliko čakajočih prenosov, je priporočljivo odstraniti vse, razen enega, in znova zagnati Steam.
- Odprite odjemalca Steam na zavihek Knjižnica .
- Na dnu boste videli možnost, ki jo je mogoče klikniti in na kateri piše » Prenos zaustavljen «. Kliknite ga, da se prikažejo vse možnosti v čakalni vrsti.

- Kliknite enega za drugim, kot je prikazano na spodnji sliki, da odstranite elemente iz čakalne vrste.

- Ko ste jih odstranili, z desno miškino tipko kliknite igre (razen tiste, ki jo želite najprej prenesti), da se prikažejo nastavitve. Ko se odprejo nastavitve , kliknite gumb » Odstrani «.

- Steam vas bo pozval, da potrdite svoja dejanja. Ko se prikaže poziv, kliknite Izbriši in znova zaženite Steam, preden poskusite znova prenesti to igro.

6. rešitev: Uporaba flush config
Za ponastavitev konfiguracije lahko poskusimo zagnati ukaz flush config. Sledite spodnjim korakom.
- Pritisnite Windows + R, da odprete aplikacijo Run.
- V vrstico za pogovor vnesite » steam: // flushconfig «.

- Pritisnite OK . Steam bo zdaj odprl okno za potrditev vaših dejanj. Pritisnite Ok in znova zaženite Steam.

7. rešitev: Zagon Steama v varnem načinu z mreženjem.
Preden se zatečete k bolj tehničnim metodam, poskusite računalnik zagnati v varnem načinu (z mreženjem) in poskusiti zagnati prenos Steam.
- Računalnik prenesite v varni način, tako da izberete različne možnosti. Izberite " Omogoči varni način z mreženjem ". Tukaj lahko izveste, kako računalnik prevesti v varni način. Če uporabljate Windows 7, ob zagonu računalnika pritisnite F8 in preusmerjeni boste v podobno okno, kjer lahko izberete želeno možnost.
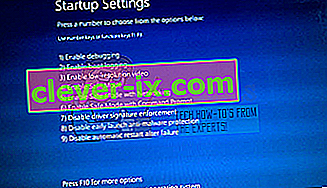
- Odprite Steam in ga znova poskusite posodobiti / namestiti. Ta metoda mora odstraniti vse ovire (če obstajajo), s katerimi se srečuje vaš Steam.

8. rešitev: Onemogočanje varnega spleta iz usmerjevalnika
Vaš usmerjevalnik WiFi ima v sebi nastavitev, imenovano varni splet . To filtrira vse dohodne podatke, za katere meni, da niso vredni zaupanja. Zelo pogosto je, da Steam označi kot enega in prekine povezavo z računalnikom.
Ker uporabnikov uporablja na stotine različnih usmerjevalnikov, je zelo težko našteti rešitev, kako onemogočiti možnost za vsakega izmed njih. Tu je nekaj smernic, da boste lahko imeli idejo.
- Web Safe najdete v razdelku za starševski nadzor v konfiguraciji usmerjevalnika WiFi.
- Najdete ga tudi v razdelku Virus ali Filtriranje .
- To enter your router settings, type the IP which is associated with it (for example for some it is 192.168.1.1). You can check the required IP either by calling your modem provider or by looking at the back of the device ( even its packaging box may have details).
Solution 9: Disabling Anti-virus and Defender/firewall
Before proceeding to reinstall Steam, we can try meddling with the antivirus. Antivirus monitors each packet of your computer sends and receives. Although Steam has collaborated with most of them so they don’t give problems, sometimes they do. The solution is to disable/uninstall them and check if you are able to download then.
McAfee Antivirus:
McAfee has no way to exclude certain files from its real time scanning. The only way is to disable the antivirus entirely until the game is updated. To do this, open McAfree and select “Virus and Spyware Protection”. Here you find the option of “Real-Time Scanning”. Click that option and turn it off.

Then follow the following instruction to verify integrity of game files.
- Restart your computer and relaunch Steam.
- Head over to the library section and right click on the game which is giving you problems.
- Click on its properties and select the local files tab.
- Click the verify integrity of game files button and Steam will verify that game in a few minutes.
Hopefully, after performing the above steps, your Steam won’t give any issue.

ESET NOD32
NOD32 has the tendency to mark some application files as malicious and will most probably quarantine it. This often results in the error while updating a game. Browse to your current Steam directory and copy the address
- The default location for your steam folder should be “C:\Program Files (x86)\Steam”.
Press ⊞ Win + R button. This should pop-up the Run application.
In the dialogue box write “C:\Program Files (x86)\Steam”.

Or if you installed Steam in another directory, you can browse to that directory and you can proceed with steps mentioned below.
After copying the address open ESET NOD32 and paste the location in exclude from real time scanning.
Follow the ‘verify integrity of game files’ method listed above and you will be all good.

Kaspersky AV
Kaspersky may sometimes flag Steam as an intruder and disable it from making any changes to the hard drive. To fix this, head over to ‘threats and exclusions’. Navigate to ‘trusted zone’ and add Steam.exe as a trusted application. Remember to change the settings to Do not restrict application activity as well as Do not scan opened files.
Follow the ‘verify integrity of game files’ method listed above and restart your computer.

Windows Defender
- Click Windows button and in the search bar type “Windows defender”. Among all the options, there will be an application named “Windows Defender Security Center”. Open it.
- Upon opening, you will find a list of options available in the new window. Select the option “Virus and threat protection”.

- Upon entering the menu, navigate to Virus and Threat Protection Settings. Windows may prompt you to allow administrator access to use this feature. If so, press Yes.

- After entering the required menu, you should search the window which says “Add or remove exclusions”. Click it and you will be navigated to a menu where you can add exclusions. You can exclude folders, extensions, and even files. In this case, we will exclude the whole Steam folder which is located in the directory you downloaded it.

- Click on the option which says “Exclude a folder” and navigate to your Steam directory. The default location for your steam folder should be “C:\Program Files (x86)\Steam”. Once you reach the location select the folder and save changes.
- Restart your computer and run Steam with administrative privileges. Hopefully, your speed issue will be resolved.
Solution 10: Downloading Latest Steam Client
- The default location for your steam folder should be “C:\Program Files (x86)\Steam”.
Press ⊞ Win + R button. This should pop-up the Run application.
In the dialogue box write “C:\Program Files (x86)\Steam”.

Or if you installed Steam in another directory, you can browse to that directory and you can proceed with steps mentioned below.
- Locate the following folders:
Steam.exe (Application)SteamApps (Folder)Userdata (Folder)
- Delete all the other files/folders/applications except the ones mentioned above.
- Head over to the Steam website and download the latest Steam client. Don’t launch the old Steam.exe present in your directory at all. The problem won’t be solved.
- Install Steam using the installer in the same directory as your previous one. Hopefully, after installation, the problem will be solved.
Solution 11: Changing Default Browser
In a weird turn of events, having Chrome or any other browser set as the default browser sometimes causes issues with the download request that Steam sends to its servers. Therefore, in this step, we will be setting internet explorer as our default browser temporarily to make sure that the download proceeds. For that:
- Press “Windows’ + “I” to open settings.
- In settings, click on “Apps” and then select “Default Apps” from the left pane.

- Click on the “Web browser” option and then select “Internet Explorer” from the list.
- Open Steam and check to see if the issue persists.

Solution 12: Removing Steam Content Server Limiter
In certain cases, it was shown that uninstalling Steam Content Server Limiter from the Classical Control Panel interface fixes this issue for a lot of people. Therefore, in this step, we will be doing exactly that. For that:
- Press “Windows’ + “R” to open the Run prompt.
- Type in “Control” and press “Enter”.

- Click on the “Uninstalla Program” option and then right-click on the “Steam Content Server Limiter” and select “Uninstall”.
- After the server limiter is uninstalled, check to see if the issue persists.

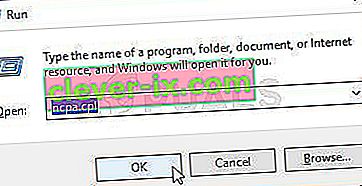
Method 13: Changing DNS
In certain situations, the server DNS that the computer is using to communicate with the internet might not be compatible either with the steam servers or it might be facing issues temporarily. Therefore, in this step, we will be changing our DNS servers. For that;
- Press “Windows’ + “R” to open the Run prompt.
- Type in “ncpa.cpl” and press “enter”.
- Right-click on your network adapter and select “Properties”.
- In properties, double click on the “Internet Protocol Version 4(TCP/IPV4)” option and check the “Use following DNS Addresses” option.
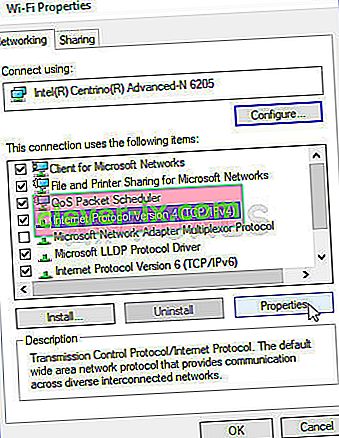
- Type in “8.8.8.8” in the primary DNS address and “8.8.4.4” in the secondary DNS address.
- Click on “OK” and then check to see if the issue persists. If it does, try using “1.1.1.1” and “1.0.0.1” in the fields respectively.


Method 14: Changing Config File
In certain situations, the config file on the computer might require some editing in order to get it some games to start working. The steps listed below are primarily for Mac but you can try them on some older OS such as Windows XP too as some users reported that this fixed it for them.
- Open the Mac Finder and navigate to the following directory.
drive_c/Program Files/Steam/config/
- Launch the “config.vdf” file and wait for it to open.
- Find the following text lines inside the file.
"InstallConfigStore" { "Software" { "Valve" { "Steam" "cip" - Paste the following lines of code under the “cip” entry in the config after creating a new line under it.
CS" "valve511.steamcontent.com;valve501.steamcontent.com;valve517.steamcontent.com;valve557.steamcontent.com;valve513.steamcontent.com;valve535.steamcontent.com;valve546.steamcontent.com;valve538.steamcontent.com;valve536.steamcontent.com;valve530.steamcontent.com;valve559.steamcontent.com;valve545.steamcontent.com;valve518.steamcontent.com;valve548.steamcontent.com;valve555.steamcontent.com;valve556.steamcontent.com;valve506.steamcontent.com;valve544.steamcontent.com;valve525.steamcontent.com;valve567.steamcontent.com;valve521.steamcontent.com;valve510.steamcontent.com;valve542.steamcontent.com;valve519.steamcontent.com;valve526.steamcontent.com;valve504.steamcontent.com;valve500.steamcontent.com;valve554.steamcontent.com;valve562.steamcontent.com;valve524.steamcontent.com;valve502.steamcontent.com;valve505.steamcontent.com;valve547.steamcontent.com;valve560.steamcontent.com;valve503.steamcontent.com;valve507.steamcontent.com;valve553.steamcontent.com;valve520.steamcontent.com;valve550.steamcontent.com;valve531.steamcontent.com;valve558.steamcontent.com;valve552.steamcontent.com;valve563.steamcontent.com;valve540.steamcontent.com;valve541.steamcontent.com;valve537.steamcontent.com;valve528.steamcontent.com;valve523.steamcontent.com;valve512.steamcontent.com;valve532.steamcontent.com;valve561.steamcontent.com;valve549.steamcontent.com;valve522.steamcontent.com;valve514.steamcontent.com;valve551.steamcontent.com;valve564.steamcontent.com;valve543.steamcontent.com;valve565.steamcontent.com;valve529.steamcontent.com;valve539.steamcontent.com;valve566.steamcontent.com;valve165.steamcontent.com;valve959.steamcontent.com;valve164.steamcontent.com;valve1611.steamcontent.com;valve1601.steamcontent.com;valve1617.steamcontent.com;valve1603.steamcontent.com;valve1602.steamcontent.com;valve1610.steamcontent.com;valve1615.steamcontent.com;valve909.steamcontent.com;valve900.steamcontent.com;valve905.steamcontent.com;valve954.steamcontent.com;valve955.steamcontent.com;valve1612.steamcontent.com;valve1607.steamcontent.com;valve1608.steamcontent.com;valve1618.steamcontent.com;valve1619.steamcontent.com;valve1606.steamcontent.com;valve1605.steamcontent.com;valve1609.steamcontent.com;valve907.steamcontent.com;valve901.steamcontent.com;valve902.steamcontent.com;valve1604.steamcontent.com;valve908.steamcontent.com;valve950.steamcontent.com;valve957.steamcontent.com;valve903.steamcontent.com;valve1614.steamcontent.com;valve904.steamcontent.com;valve952.steamcontent.com;valve1616.steamcontent.com;valve1613.steamcontent.com;valve958.steamcontent.com;valve956.steamcontent.com;valve906.steamcontent.com"
- Save your changes and check to see if the issue persists.
Note: Some users reported to fix the issue after having to deleting the CM List IP addresses in the file aswell in addition to pasting this code.


