0xc000000e napake, ko poskušate zagnati okna pomeni, da ste se ukvarjajo s poškodovano Boot Configuration Data. Podatki o konfiguraciji zagona so globalna trgovina z vsemi možnostmi in nastavitvami, povezanimi z zagonom v novejših računalnikih z operacijskim sistemom Windows.
To napako boste dobili pri poskusu zagona naprave in prikazal se bo črni zaslon z navodili za popravilo računalnika z namestitvenim diskom ali obnovitvenim pogonom. Na žalost je to težavo edini način, da rešite obnovitveni pogon, zato ga morate pred začetkom dobiti v roke. Če ga nimate, ga je dokaj enostavno ustvariti z orodjem Rufus ali Windows Media Creation iz katerega koli drugega računalnika ali prenosnika.

Prav tako se boste morali zagnati v BIOS-u, da spremenite vrstni red zagona in zaženete računalnik z obnovitvenega pogona namesto s trdega diska. Če želite to narediti, uporabite naslednje korake:
- V nastavitve BIOS-a ali UEFI vnesite s pritiskom na tipko proizvajalca matične plošče pred zagonom sistema Windows. Ta tipka je običajno Esc, Delete, F2, F8, F10, F12 ali Backspace, odvisno od proizvajalca. S spletnim iskanjem lahko vnesete BIOS, čemur sledi model računalnika.
- Ko pridete v notranjost, pojdite na Zagon Uporabite navodila v BIOS-u, da spremenite vrstni red zagona in za prvo napravo nastavite CD-ROM ali vrata USB, odvisno od tega, ali je obnovitveni pogon CD ali bliskovni pogon. .
- Shranite nastavitve in zapustite.

1. način: Obnovite konfiguracijske podatke zagona
Če želite to narediti, morate računalnik zagnati z obnovitvenega pogona. Če ste BIOS konfigurirali z zgornjimi koraki, lahko to storite s pritiskom katere koli tipke, ko se na zaslonu prikaže poziv. Ko se računalnik zažene z obnovitvenega pogona, z naslednjimi koraki obnovite BCD:
- V pogovornem oknu za namestitev sistema Windows nastavite vse na ustrezne vrednosti, izberite svoj jezik in kliknite
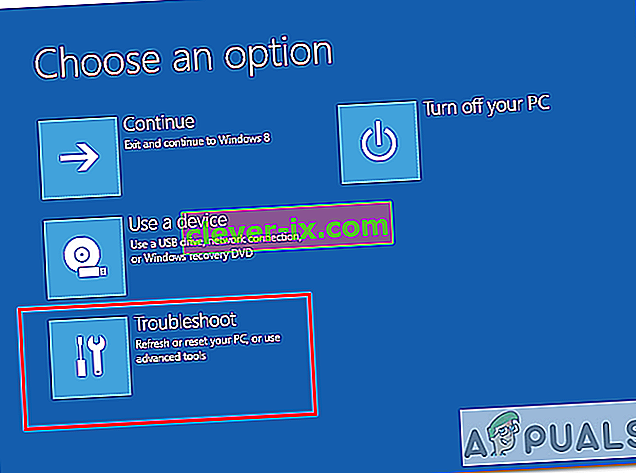
- V spodnjem levem kotu, kliknite na popravilo računalnika , in izberite Odpravljanje težav s Izberite možnost zaslonu.
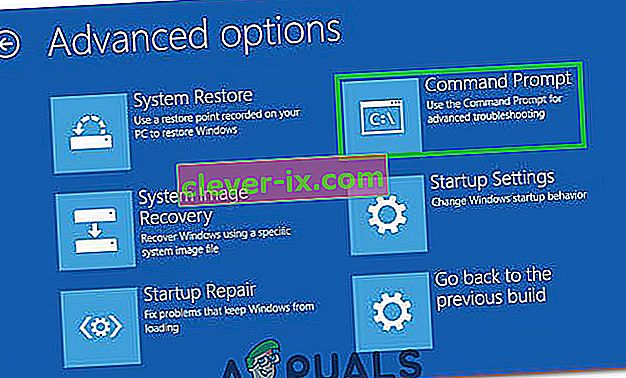
- Na zaslonu za odpravljanje težav kliknite Napredne možnosti in kliknite Ukazni poziv.
- Ko se odpre ukazni poziv, vnesite naslednje ukaze in pritisnite tipko Enter na tipkovnici za vsakim od njih:
bootrec / scanos bootrec / fixmbr bootrec / fixboot bootrec / rebuildbcd
- Znova zaženite računalnik in zagotovo bi se zagotovo zagnal, ne da bi se znova soočil s težavo.

2. način: Popravite svoj OS z obnovitvenim pogonom
Ta metoda bo popravila tudi vaš OS z ukaznim pozivom obnovitvenega pogona in zagotovo se boste lahko zagnali v sistemu Windows, ne da bi se znova soočili s težavo. Zaženite sistem z obnovitvenega pogona in sledite spodnjim navodilom.
- Uporabite korake od 1 do 3 prejšnje metode, da pridete do ukaznega poziva obnovitvenega pogona.
- Ko vstopite v ukazni poziv, vnesite spodnje ukaze, ki jim sledi Enter na tipkovnici, da jih izvedete. Pripomoček StartRep.exe popravi vrednosti zagonskega okolja in odpravi napako BCD. Upoštevajte, da boste morda morali ta korak večkrat ponoviti, če ne bo uspel.
cd x: \ sources \ recovery StartRep.exe
- Če prejšnji korak popravljanja sistema Windows ni pomagal, v ukazni poziv vnesite bcdedit , da si ogledate vrednosti za Windows Boot Manager.
- Upoštevajte vrednosti za napravo . Če so neznani , vnesite naslednje ukaze, ki jim sledi Enter, da jih izvedete. Po potrebi zamenjajte C: s particijo, v kateri je nameščen vaš operacijski sistem.
bcdedit / set {DEFAULT.EN_US} particija naprave = c: bcdedit / set {DEFAULT.EN_US} particija osdevice = c: bcdedit / set {BOOTMGR.EN_US} particija naprave = c:- Ko je ukazni poziv končan, ga zaprite, odstranite obnovitveni pogon in znova zaženite sistem. Zdaj ne bi smelo imeti težav z zagonom.
Edina pomanjkljivost teh rešitev je, da zahtevajo obnovitveni pogon, potrpljenje in močne živce. Če pa jim sledite, kot je opisano, odpravite napako, ki ste jo prejeli, in nadaljujte z uporabo naprave kot prej.
3. način: Omogočite podporo za Windows 10 WHQL v BIOS-u
Nastavitev podpore za Windows 10 WHQL obstaja v nekaterih proizvajalcih originalne opreme. Ima dve osnovni funkciji: preverja podpisane gonilnike med zagonom in omogoča omogočanje podpore UEFI. Če uporabljate Windows 10, ga morate omogočiti in nato se bo računalnik lahko normalno zagnal. Če pa ni izbran, se lahko računalnik zažene z napako 0xc000000e. Torej lahko dostopate do BIOS-a in preverite, ali je omogočena nastavitev podpore za Windows 10 WHQL. Če ne, omogočite poskus.
Upoštevajte, da nastavitev podpore za WHQL za Windows 10 ni podprta v vseh računalnikih. Če je vaš računalnik nima, lahko preverite, ali je v vašem računalniku omogočena podpora za UEFI. V nasprotnem primeru ga lahko omogočite, da vidite, ali koda napake 0xc000000e izgine. Da bi to omogočili:
- Popolnoma izklopite računalnik in pustite, da sedi vsaj nekaj minut.
- Potem ko se prepričate, da je pretekel ustrezen čas, zaženite računalnik nazaj in opazili boste možnost » Pritisnite ta gumb za zagon v način Bios «.
- Pritisnite gumb za zagon v načinu Bios.
- Po uspešnem zagonu v načinu Bios preverite, ali je v Biosu nastavitev Windows WHQL.
- Če je prisoten, pritisnite "Enter", da ga izberete, potem ko ga označite s puščičnimi tipkami, in izberite možnost "Enabled" , da ga omogočite v računalniku.

- Preverite, ali to odpravlja težavo.

Če se po omogočitvi nastavitve podpore za Windows 10 WHQL ali podpori UEFI še vedno pojavi zagonska napaka 0xc000000e pri zagonu Windows 10xc000000e, boste morda morali ponastaviti konfiguracijo BIOS / UEFI v računalniku.
4. način: Obnovite BCD s pomočjo Easy Recovery Essentials
Easy Recovery Essentials je funkcija samodejnega popravila sistema z enim klikom, ki vključuje popolno popravilo in rekonstrukcijo BCD za odpravo napake »0xc000000e«, tudi v primerih, ko se Windows zaradi napake ne zažene.
Komponenta za avtomatizirano popravilo zagona EasyRE bo odpravila vse težave, povezane z BCD, popravila BCD ali njegovo ponovno ustvarjanje iz nič s pomočjo pravilnega kodiranja in poti za particijo, ki se noče pravilno naložiti. Disk bo tudi označil kot povezan, da bo zagotovil pravilno delovanje.
Easy Recovery Essentials bo zagotovo samodejno odpravil napako »0xc000000e« z uporabo vgrajene možnosti samodejnega popravila. EasyRE je trenutno na voljo za Windows XP, Vista, 7, 8, 10 in ga je mogoče prenesti in ustvariti v katerem koli računalniku.
- Poiščite drug računalnik, s katerim lahko ustvarite USB, s katerega bomo računalnik zagnali.
- Prenesite Easy Recovery Essentials od tukaj.

- Zapiši sliko.
- Zaženite računalnik s CD-ja Easy Recovery Essentials ali USB-ja, ki ste ga ustvarili.
- Ko se EasyRE zažene, izberite možnost »Samodejno popravilo« in kliknite Nadaljuj.
- Ko EasyRE pregleda pogone vašega računalnika, na seznamu poiščite in izberite črko pogona za namestitev sistema Windows, nato pa za začetek kliknite možnost samodejnega popravila .
- Easy Recovery Essentials bo začel analizirati izbrani pogon zaradi težav. EasyRE bo preizkusil in poskušal samodejno popraviti napake na disku, particiji, zagonskem sektorju, datotečnem sistemu, zagonskem nalagalniku in registru. Posredovanje ni potrebno, saj je popravilo EasyRE popolnoma avtomatizirano.
- Ko bo postopek končan, bo EasyRE poročal o svojih ugotovitvah. Kliknite gumb Restart, da znova zaženete računalnik in preizkusite spremembe.

5. način: Ponastavitev konfiguracije BIOS / UEFI
Nekateri uporabniki so rekli, da je bila njihova težava 0xc000000e odpravljena s ponastavitvijo konfiguracije BIOS / UEFI. Torej, razmislite o poskusu te metode, da ugotovite, ali je to težavo mogoče rešiti.
Korak 1. Odprite meni BIOS
Če želite BIOS ponastaviti na privzete nastavitve, morate najprej odpreti meni BIOS in najprej najti možnost Privzete nastavitve.
Uporabniki sistema Windows 10 lahko dostopajo do naprednih zagonskih možnosti sistema Windows 10 in vstopijo v meni BIOS-a. Za ponovni zagon sistema Windows v obnovitveno okolje sistema Windows lahko kliknete Start -> Power, pritisnete in držite tipko Shift ter kliknete gumb Restart. Nato kliknite Odpravljanje težav -> Napredne možnosti -> Nastavitve vdelane programske opreme UEFI in kliknite Znova zaženi, da odprete zaslon z nastavitvami BIOS-a.
Lahko pa tudi normalno zaženete računalnik in na zagonskem zaslonu pritisnete zahtevano tipko za zagon v okno z nastavitvami BIOS-a. Bližnjične tipke se razlikujejo med različnimi proizvajalci računalnikov, lahko pa so to F12, Del, Esc, F8, F2 itd.
Korak 2. Poiščite možnost Privzete nastavitve
Ime in lokacija možnosti »Nastavitve privzeto« se lahko razlikujeta od različnih računalnikov. Običajno kliče, kot so: Load Default, Load Setup Privzeto, Load Default Settings, Load BIOS Defaults, Load Optimal Privzeto itd.
S puščičnimi tipkami na tipkovnici računalnika poiščite privzeto možnost nastavitve BIOS-a na zaslonu nastavitev BIOS-a. Najdete ga na enem od zavihkov BIOS-a.
Korak 3. Ponastavite BIOS
After you find the Load Setup Defaults option, you can select it and press the Enter button to start resetting the BIOS to factory default settings in Windows 10.
At last, you can press F10 to save and exit BIOS. Your computer will automatically reboot. If you need to change BIOS settings again in the future, you can follow the same instructions to access BIOS again to change it.
Method 6: Mark Boot Disk As Online
It is possible in some cases, that the disk that you have connected to the computer or the USB that you are trying to boot from has been marked as offline by the computer. Some computers tend to prevent extra applications, hardware, and other things from being able to run as soon as the computer starts because it allows for more convenient and fast startup experience. Therefore, in this step, we will be marking the Disk as online.
You still need to use a bootable USB medium to do this job. We will show you a step-by-step guide here:
- After booting your computer from the bootable USB drive, you need to go to Next > Repair your computer. Then, you will enter WinRE.
- Go to Troubleshoot > Advanced options > Command Prompt.
- Make sure to properly enter your login credentials if you are asked by the computer.
- Type in the following command inside the command prompt to successfully launch the disk part utility on your computer.
diskpart
- Type in either one of the following commands in the next window to list the currently connected disk drives to your computer.
List Disk List Volume
- Once the disks have been listed, you need to identify the disk that contains the Windows operating system and the one that you want to mark as active.
- After identifying it, select the disk using the following command and replacing the alphabet with the driver letter of that disk.
select disk A Select Volume A (Replace A with the Drive Letter)
- After you have successfully selected the disk, you must mark the disk as online in order to initiate the recognization process of the disk at startup. Use the following commands to do that.
Online Disk Online Volume
- Type in the following command to successfully get out of the command prompt and restart your computer after that.
Exit
- Check to see if marking the Disk as online has fixed your issue.

Method 7: Check your data cables, BIOS and drivers
Unplug all HDD data cables, and then plug them again. Revert to the previous drivers and BIOS settings if they were changed, or use “Restore factory settings” option in the BIOS. Make sure to write down all current BIOS settings that were previously selected, just in case it is required to switch back. If the error is caused by a change of the SATA disk controller’s mode in the BIOS or firmware, the fix can be as simple as entering the BIOS and toggling the SATA controller’s “mode” setting. The exact instructions differ from one manufacturer to the other, but the options will resemble what is shown in the screenshots below.
To check the boot order, follow these steps:
- Restart the computer
- Press the necessary key to open the BIOS menu. This key depends on the computer manufacturer and computer model. This is usually listed on the first screen that appears on the monitor. It can be any of the following: Esc, Del, F2, F8, F10 or F12.
- If the screen shows multiple keys, find the key to open “BIOS”, “setup” or “BIOS menu”
- Attempt to toggle between all three (or more) modes until a combination that results in Windows booting successfully once more is found.
Method 8: Boot Windows In Safe Mode
If above solutions didn’t fix the problem, then Start Windows into safe mode. This will start your PC with minimum system requirements, will not load startup programs, add-ons etc. And allow performing troubleshooting steps to fix Boot Error 0xc000000e:
Before you enter the safe mode, you need to enter the Windows Recovery Environment (winRE). To do this, you will repeatedly turn your device OFF, then ON:
- Hold down the power button for 10 seconds to turn off your device.
- Press the power button again to turn on your device.
- On the first sign that Windows has started (for example, some devices show the manufacturer’s logo when restarting) hold down the power button for 10 seconds to turn off your device.
- Press the power button again to turn on your device.
- When Windows restarts, hold down the power button for 10 seconds to turn off your device.
- Press the power button again to turn on your device.
- Allow your device to fully restart and you should boot into the Windows Recovery Environment.
Now that you are in the Windows Recovery Environment, you will follow these steps to take you to safe mode:
- On the Choose an option, screen, select “Troubleshoot” and then “Advanced options.”
- Now click on “Startup Settings” and click on “Restart.”
- After your device restarts, you’ll see a list of options. Select option “4” from the list or press “F4” to enter Safe Mode.

Note: If you need to exit safe mode, simply restart your device, or:
- Press the “Windows logo key + R.”
- Type “msconfig” in the Run box and then select “OK”.

- Select the Boot tab and under Boot options, clear the Safe boot checkbox.

Method 9: Check your disk with CHKDSK utility
If the hard drive has its file integrity compromised, it is possible to use built-in Windows CHKDSK utility to scan the disk and fix the file system errors.
- Connect a USB drive that has been made bootable or insert the Windows Installation Disk on your computer.
- After connecting one of these, boot from that connected device.
- After booting your computer from the device, click on “Next” and then on the “Repair your Computer” option.
- On the next window, click on “Troubleshoot” and then on the “Advanced” Option.

- On the next screen, make sure to select the “CommandPrompt” option to successfully launch into the command prompt.
- Provide the login credentials of your account in order to boot inside the cmd.
- Inside the command prompt, type in the following command to successfully run the check disk utility on your computer.
chkdsk C: /f (Make sure to replace the "C" with the Drive letter of your partition).
- Confirm any on-screen prompts and wait for the scan to be fully completed.
- Check to see if the issue is fixed by performing this step.
Method 10: Disable fast startup Feature
If your computer has been set up to use the Fast Startup feature, you might be getting this error message on your screen because of doing so. The Fast Startup feature is known to malfunction with some operating systems and hardware combinations.
Basically, when enabled, the feature automatically sends some launch configurations to be stored in your RAM to allow for a faster startup as indicated by its name but this configuration data can sometimes be corrupted which can lead to this error on your computer. Therefore, in this step, we will be disabling it completely. For that:
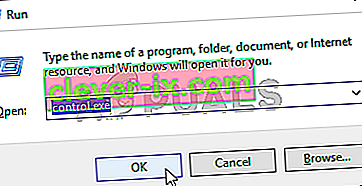
- Press “Windows” + “R” to open the Run prompt.
- Type in “Control Panel” and press “enter” to launch the classical Control Panel interface.
- Inside the control panel, click on the “Hardware and Sound” option and then select the “Power Options” button.

- Inside the power options, click on the “Choose what the power button does” from the left side.
- Click on the “Change Settings” option if the fast startup option is greyed out.
- Make sure to uncheck the “Turn on Fast Startup” option and save your changes.
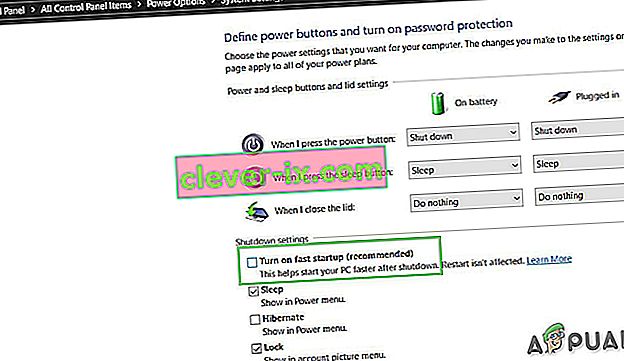
- Closeout of the window and terminate any unnecessary applications.
- Click on the “Start Menu”, click on the “Power Options” and select “Shutdown” from the list.
- This option should completely power down your computer and after performing a complete shutdown, wait for some minutes before turning your computer back on.
- After the computer turns back on, check to see if the error message is fixed.
Note: This solution can only be applied if you are able to sometimes boot up your computer normally and are only encountering this error momentarily.


Method 11: Repair Corrupted System Files
It also possible in some situations that certain system files might have been corrupted due to a storage failure or due to some other reason. Therefore, in this step, we will be performing a complete repair of the corrupted system files and then we will check to see if doing so fixes this issue. For that:
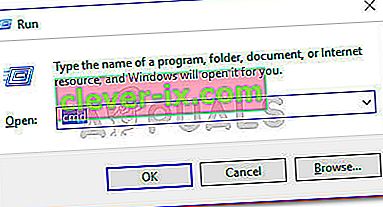
- Press “Windows” + “R” to open the Run prompt.
- Type in “cmd” and then press “Shift” + “Ctrl” + “Enter” to launch the command prompt with admin privileges.
- Type in the following commands one by one and press “Enter” after each to successfully run an SFC scan and a DISM Scan on your computer.
DISM /Online /Cleanup-Image /RestoreHealth sfc /scannow
- Restart your computer completely once these scans are completed.
- Check to see if by performing these scans, you were able to fix this issue on your computer.

Method 12: Run Windows Startup Repair
Startup Repair is capable of diagnosing and fixing the found issues. For example, it can automatically scan system files, registry settings, configuration settings, etc. and try to fix the problem on its own. Startup Repair is especially useful when your computer is unbootable. Since your computer fails to boot, Windows can boot into WinRE automatically. While, if it doesn’t appear, you can interrupt the boot process three times in a row, and then the WinRE screen appears. Alternatively, if you have a bootable USB medium, you can also set your computer to boot from it and go to Repair your computer to enter WinRE.
After you have successfully booted into the Windows Recovery Environment, click on the “Troubleshoot” option, and from there, select the “Advanced Options” screen. Inside the advanced options, select the “StartupRepair” button to successfully initiate the Startup Repairing process. Windows will begin to diagnose your computer automatically. When the process ends, your computer will restart automatically. You can wait to see whether it can boot successfully.

Rešitev: Pred skokom v ukazno vrstico ali popravilom zagona se prepričajte, da niso priključene nobene dodatne naprave, najbolje je, da poskusite znova znova, z najmanjšim številom naprav in zunanjih pogonov, priključenih na računalnik. Tako boste zagotovili, da težave ne povzroča ničesar, kar je bilo nedavno dodano v računalnik. Najbolje bi bilo, da odklopite vse nedavne pogone USB, CD-je, DVD-je itd. To vključuje tudi bralnik pomnilniških kartic. Prepričajte se, da so vsi zunanji pogoni in ključi USB ali pogonski pogoni USB odklopljeni, nato poskusite znova.


