Nord VPN je eden izmed starih igralcev v svetu VPN in njegova aplikacija Windows velja za eno najboljših v svetu osebnih računalnikov. Nord VPN je zelo raznolik, če govorimo glede funkcionalnosti in prilagodljivosti. Poleg podpore med različnimi platformami ima tudi različne strežnike v različnih državah, med katerimi lahko izbirate.

Kljub temu, da je aplikacija na trgu že precej dolgo, uporabniki poročajo, da se ne morejo povezati z Nord VPN. Po morebitni posodobitvi se neha povezovati ali pa zahteva za strežnike DNS vrne odgovor s časovno omejitvijo.
Kaj povzroča, da se Nord VPN ne poveže?
Ker VPN uporablja celotno internetno arhitekturo računalniškega sistema, obstaja več razlogov, zakaj se vaš Nord VPN morda ne bo mogel pravilno povezati. Nekateri od teh so navedeni spodaj.
- IPv6: Očitno Nord VPN v nobeni od svojih komunikacij ne podpira protokola IPv6. Če je to omogočeno, se morda ne boste mogli povezati.
- Programi tretjih oseb: Znano je, da so programi tretjih oseb v nasprotju s sistemom programske opreme in tekmujejo za vire; zato povzroča, da se ne poveže pravilno.
- Omrežni vmesnik: Ker Nord za komunikacijo z internetom uporablja ločen omrežni vmesnik, lahko zgodi, da omrežni vmesnik ne deluje pravilno in ga morate znova zagnati.
- Napaka v omrežju: včasih so omrežne konfiguracije v računalniku morda v stanju napake, zaradi česar sploh ni povezave. V tem primeru lahko poskusimo osvežiti vse spremenljivke.
Preden začnemo z rešitvami, se morate prepričati, da vaš internet dejansko deluje . Če vaš internet ne deluje pravilno, Nord ne bo mogel vzpostaviti ustrezne povezave in vam omogočiti dostopa do tuneliranega omrežja.
Prepričajte se, da uporabljate zasebno omrežje (ne šolo, službo ali javna mesta, kot so bolnišnice) in da niso vpleteni nobeni pooblaščenci. Ko ste še enkrat preverili, ali internet deluje dobro, nadaljujte.
1. rešitev: Onemogočanje IPv6
IPv6 (Internet Version Protocol 6) je najnovejša različica IP-ja v omrežni arhitekturi računalnika. Privzeto še vedno uporabljamo IPv4 in še vedno nismo trajno prešli na IPv6. Vendar pa je morda med vami nekaj, ki ste začeli uporabljati IPv6 za internetno povezljivost. Zdi se, da IPv6 ne deluje pravilno z Nord VPN. Zato ga bomo onemogočili in ponovno preverili.
- Z desno miškino tipko kliknite ikono omrežja v opravilni vrstici in izberite Odpri omrežne in internetne nastavitve . Zdaj v nastavitvah kliknite možnost Spremeni možnosti adapterja .

- V nastavitvah adapterja z desno miškino tipko kliknite adapter, ki ga uporabljate, in izberite Lastnosti .
- Ko v adapter lastnosti, počistite z IPv6 možnost in se prepričajte, da se IPv4 omogočen. Shranite spremembe in zapustite. Zdaj znova zaženite računalnik in preverite, ali je napaka odpravljena, in se lahko povežete s Nord VPN.

2. rešitev: Preverjanje programov drugih proizvajalcev
Obstajajo številne druge aplikacije in programi, ki se zdijo v nasprotju z Nord VPN pri njegovem delovanju. Če več virov poskuša dostopati do vira, bo stanje dirke in ne bodo delovale po pričakovanjih.

Odprite upravitelja opravil (Windows + R in 'taskmgr') in preverite vse programe, ki se izvajajo v ozadju. Ena izmed takih aplikacij, za katero je bilo znano, da povzroča težave, je bila Glasswire Elite . Ko se poskusite povezati z Nord VPN, ga odstranite ali pa onemogočite.
Opomba: Poskusite tudi očistiti zagonski računalnik. To bo onemogočilo vse zunanje programe drugih proizvajalcev in zagnalo samo potrebne. Zdaj lahko poskusite vzpostaviti povezavo. Če ste uspešni, to pomeni, da je težavo povzročila neka aplikacija. Lahko se vrnete nazaj tako, da omogočite vsako aplikacijo in znova preverite.
3. rešitev: Spreminjanje lokacije strežnika
Nord VPN daje uporabnikom možnost izbire lokacije strežnika. Ti strežniki so razpršeni po vsem svetu in omogočajo povezljivost glede na njihovo geografsko lokacijo, tj. Strežnik, ki je bližje vam, naj bi bil hitrejši. Poskusili bomo spremeniti lokacijo strežnika, ki jo želite povezati, in preveriti, ali to rešuje težavo, ki ni povezana.
- Zaženite Nord VPN in kliknite naslov Strežniki na vrhu aplikacije.

- Zdaj izberite drug strežnik kot prej in po izbiri poskusite znova zagnati VPN. Če imate enako vedenje, poskusite izbrati drug strežnik in preizkusiti omrežje na drugem spletnem mestu.
4. rešitev: Ponovni zagon omrežja / adapterja TAP
Nord VPN na vašem računalniku ustvari navidezni omrežni vmesnik, ki ga lahko uporablja za sporočanje informacij. Deluje kot most, v katerem Nord VPN spremeni nastavitve, tako da lahko vzpostavi in vzdržuje povezavo VPN. Včasih gre za napako, zaradi katere se ne povežete s strežnikom VPN. Adapter bomo znova zagnali, kar bo zagotovilo, da se bodo vse njegove konfiguracije znova zagnale.
- Pritisnite Windows + R, vnesite „ ncpa. cpl "v pogovornem oknu in pritisnite Enter.
- Vsi omrežni vmesniki bodo navedeni pred vami. Izberite adapter TAP, z desno miškino tipko kliknite in izberite Onemogoči .

- Ko ga onemogočite, počakajte minuto. Nato znova kliknite z desno miškino tipko in izberite Omogoči . Zdaj poskusite povezati Nord VPN in preverite, ali je to v redu.
5. rešitev: izpiranje omrežnega sklada
Obstaja nešteto primerov, ko splakovanje (osveževanje) omrežnega sklada v računalniku rešuje različne težave, povezane z VPN (vključno s Nordom). S tem postopkom boste izpraznili nastavitve DNS in IP ter se prepričali, da ni nepravilnih nastavitev, ki bi bile v nasprotju z aplikacijo.
- Pritisnite Windows + S, v pogovorno okno vnesite »ukazni poziv«, z desno miškino tipko kliknite aplikacijo in izberite Zaženi kot skrbnik .
- Ko ste v povišanem ukaznem pozivu, za vsakim ukazom izvedite naslednje ukaze, ki jim sledi ključ Enter:
ipconfig / javnost ipconfig / flushdns ipconfig / obnovitev netsh winsock reset netsh vmesnik ipv4 reset netsh vmesnik ipv6 reset netsh winsock reset katalog netsh int ipv4 reset reset.log netsh int ipv6 reset reset.log

- Zdaj zaprite ukazni poziv in poskusite znova zagnati Nord VPN. Preverite, ali se lahko pravilno povežete z njim.
6. rešitev: Ponovna namestitev Nord VPN (skupaj z adapterjem TAP)
Če vsi zgornji načini ne delujejo, se prepričajte, da je vaša namestitev Nord pravilna in da z namestitvenimi datotek ni nič narobe. Vmesnik TAP bo prav tako znova nameščen, ker Nord VPN upravlja z adapterjem in je samo za njegovo uporabo. Prepričajte se, da ste prijavljeni kot skrbnik. Če ponovna namestitev ne deluje, se prepričajte, da so vaše poverilnice pravilne, za katere vnašate storitve, niso potekle.
- Pritisnite Windows + R, v pogovorno okno vnesite "appwiz.cpl" in pritisnite Enter.
- V upravitelju aplikacij poiščite vnos Nord VPN s seznama, z desno miškino tipko kliknite nanj in izberite Odstrani .

- Zdaj znova zaženite računalnik in znova prenesite aplikacijo z uradnega spletnega mesta Nord VPN. Po vnosu poverilnic se poskusite znova povezati in preverite, ali lahko pravilno vzpostavite povezavo VPN.
7. rešitev: Uporaba nadomestne storitve VPN
Na trgu Windows je veliko odjemalcev VPN. Vendar bralcem priporočamo, da preizkusijo CyberGhost. Ta storitev VPN je čim preprostejša in vam ponuja tudi strežnike, ki se nahajajo v različnih državah. Ima celo ločene strežnike VPN za enostavno pretakanje Netflixa in BBC. Sledite spodnjim korakom, da prenesete aplikacijo in v kratkem zagotovite varno povezavo.
- Download CyberGhost from (here).

- After downloading the VPN, install it on your computer. You might be asked for proper permissions. Make sure that you are logged in as an administrator and press Yes to all the permissions asked.
- After CyberGhost is installed on your computer, launch it. Here you will see a list of different servers available along with the distance from your actual location (more distance means slower internet).

- After selecting the server, click on the power button present at the right-hand side of the application. You can also select dedicated servers for torrenting and streaming (present at the left navigation pane).
Solution 8: Disable Firewall
In some cases, the default Windows Firewall might be preventing the application from working properly. Therefore, in this step, we will first be allowing it through the Firewall and make sure that it isn’t blocked by the Firewall and then we will also make sure that Windows Defender has it added as an exception. For that:
- Press “Windows” + “R” to launch the Run prompt.
- Type in “ControlPanel” and press “Enter” to launch the classical control panel interface.

- Click on the “View by:” button, select “Large Icons” and then click on the Windows Defender Firewall option.
- Select the “Allow an app orfeature through the Firewall” button on the left pane and then click on the “Change Settings” button and accept the prompt.
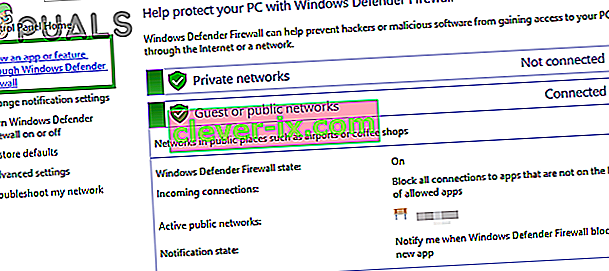
- From here, make sure that you check both the “Public” and the “Private” options for Nord VPN and its related applications/drivers.
- Save your changes and exit out of the window.
- After that, press “Windows” + “I” to launch the settings and click on the “Updateand Security” option.

- From the left pane, click on the “Windows Security” button and then click on the “Virus and Threat Protection” button.
- Select the “Manage Settings” button under the Virus and Threat Protection Settings heading.
- Scroll down and click on the “Add or Remove Exclusions” button in the next window.
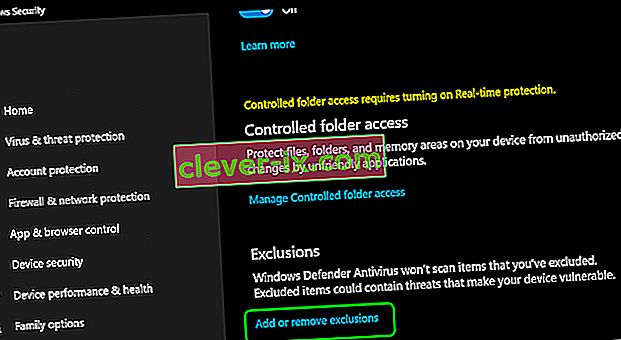
- Click on the “Add an Exclusion” option and select “Folder’ from the File type.
- Make sure to specify the Nord VPN folder and exit out of this window after saving your changes
- Check and see if doing so has fixed the issue with Nord VPN not connecting.


Solution 9: Change NordVPN Protocol
It is possible that Nord VPN might be running into issues while trying to connect to its servers due to the protocol configuration in its settings. If one type of protocol isn’t working for you, it is always recommended to try and switch to the other protocol to make sure that the issue isn’t tied to the wrong selection of the protocol type automatically or manually. For that:
- Launch NordVPN and make sure to disconnect from any currently active sessions.
- Click on the “Gear” icon on the top right corner and go into the settings.
- Click on the “Advanced” option from the left-hand side menu.
- Click on the “Protocol” dropdown and check on “TCP”.
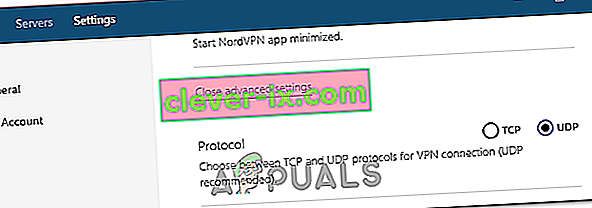
- This should change your protocol from TCP to UDP.
- Check to see if doing so fixes the issue for your computer.
- To Verify that none of the protocols work, make sure to repeat the steps and select “UDP” instead of TCP and then check again.
- If none of the selected protocols are able to make a connection with the server, move on to the other fixes.

Solution 10: Changing DNS Server Configuration
DNS Servers are used by the computer to establish a stable and secure internet connection with other sites on the internet, however, if the computer is unable to detect the DNS settings properly, or if the selected DNS server is facing outage, Nord VPN might not connect properly. Therefore, in this step, we will be changing the DNS configuration to ensure that DNS isn’t an issue. For that:
- Press “Windows” + “R” to launch the Run prompt.
- Type in “ncpa.cpl” and press “Enter” on the keyboard to launch the network configuration panel.
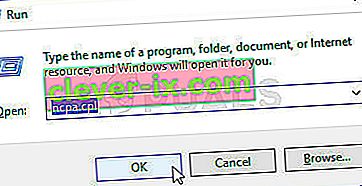
- Right-click on your internet connection and select the “Properties” option.
- Double click on the “Internet Protocol Version4 (TCP/IPV4)” option and check on the “Use the following DNS addresses” button.
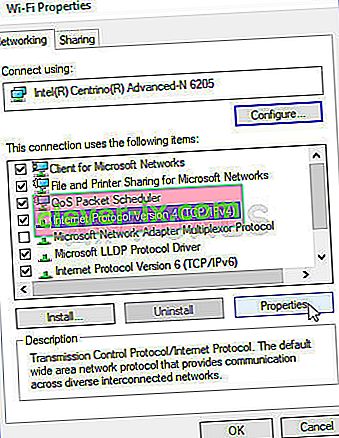
- At first, type in “8.8.8.8” and “8.8.4.4” in the primary and the secondary DNS addresses field respectively and click on “OK”. After that, check to see if NordVPN is connecting, if it isn’t, try to use “103.86.96.100” and “103.86.99.100” in the primary and the secondary fields respectively.
- Check to see if you are able to make a connection by selecting those DNS servers.


Solution 11: Opening Ports
For some people, the issue might arise if the ports that NordVPN uses to communicate with its servers are being blocked by your router. For security reasons most routers often block ports used by VPN/Network Tools to prevent any alterations to your connections and if that is the case, we will have to open the ports by logging in to the router’s control panel. For that:
- Press “Windows” + “R” to launch the Run prompt and type in “cmd” and then press “Ctrl” + “Shift’ + “Enter” keys on your keyboard to provide admin permissions.

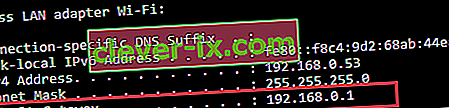
- Type in the following command in the command prompt to list the IP information.
ipconfig /all
- The computer will list all the information of the network adapters connected to your computer.
- Under the default gateway option, after the mac address, there should be an IP address that should look something like “192.168.x.x”.
- Copy this IP address and launch your browser.
- Paste the IP address within a new tab on the browser and press “Enter” to navigate to the browser’s login page.
- Once on the login page, log into the control panel with your credentials, both of which, i.e the username and password should be written on the back of your internet router. If not, then the username should be admin and the password should be the Wifi password that you use to connect your devices.
- After logging into the Control panel, look around for a “NAT” or “Port” option that allows you to forward ports.
- Type in “500” and select “UDP” from the list.
- Click on “Save” to forward the 500 UDP port and exit out of the control panel after the change has been made.
- Try connecting with Nord VPN and check to see if the issue persists.


Solution 12: Use Hotspot
Mostly, this error can be fixed simply by employing your mobile’s hotspot connection instead of the Wifi or the Wired connection that you are already using on your computer. This does seem an inconvenience for Data conscious people but it seems to be the only way some people are able to connect through Nord VPN as some routers block it completely.
Note: In addition to this, you can try to change the firmware on your router to avoid any permanent blocks put from the router or to eliminate any bugs with the connection.


