Nekateri uporabniki sistema Windows, ki so pred kratkim nadgradili na sistem Windows 10, so se večkrat pritožili nad vrstico opravil. Ko se to zgodi, uporabniki ne morejo klikniti nobenega elementa v opravilni vrstici, tj. Menija Start, ikon in obvestil. Bližnjice, kot sta Windows + R in Windows + X, ne delujejo.
Ta težava nima osnovnega vzroka, saj je zelo pogosta v sistemu Windows. Nekateri pa so ga povezali z Dropboxom in nekaj okvarjenimi aplikacijami. V tem članku bomo raziskali različne možnosti, s katerimi lahko rešimo to težavo. To vključuje izvajanje skeniranja SFC, odstranjevanje nekaterih aplikacij, zagon raziskovalca, med drugim.
1. način: Ponovni zagon Raziskovalca
- Pritisnite tipki Ctrl + Shift + Esc, da zaženete upravitelja opravil sistema Windows.
- V upravitelju opravil kliknite Datoteka > Zaženi novo opravilo . V odprto polje vnesite raziskovalec, nato potrdite polje »Ustvari to nalogo s skrbniškimi pravicami« in kliknite V redu .

Lahko pa tudi:
- Pritisnite tipki Ctrl + Shift + Esc, da zaženete upravitelja opravil sistema Windows.
- Poiščite Explorer na zavihku procesi
- Z desno miškino tipko kliknite vnos Explorerja in izberite Ponovni zagon .
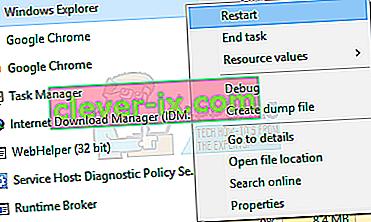
- Raziskovalec se bo znova zagnal in opravilna vrstica naj začne znova delovati

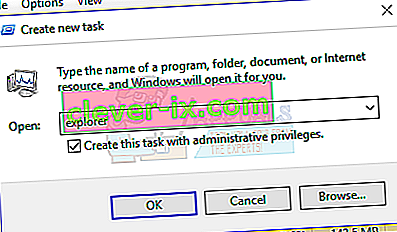
2. način: Zagon skeniranja SFC
- Pritisnite tipki Ctrl + Shift + Esc, da zaženete upravitelja opravil sistema Windows.
- V upravitelju opravil kliknite Start> Zaženi novo opravilo . V odprto polje vnesite cmd, nato potrdite polje »Ustvari to nalogo s skrbniškimi pravicami« in kliknite V redu .
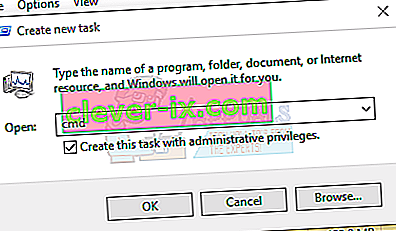
- V ukazni poziv vnesite naslednje ukaze in po vsakem ukazu pritisnite Enter:
sfc / scannow dism / Online / Cleanup-image / Restorehealth
To bo zagnalo preverjanje sistemskih datotek in popravilo vseh poškodovanih sistemskih datotek v računalniku.
- Znova zaženite računalnik in preverite, ali je zamrznjena opravilna vrstica prenehala.

3. metoda: Powershell Fix
S tem ukazom Powershell odmrznite zamrznjeno opravilno vrstico po teh korakih.
- Ctrl + Shift + Esc za zagon upravitelja opravil sistema Windows.
- Kliknite Več podrobnosti , izberite zavihek Storitve in se prepričajte, da se izvaja MpsSvc (požarni zid Windows).
- Pritisnite tipko Windows + R, da odprete poziv za zagon. V poziv vnesite PowerShell in pritisnite Enter.
Če se poziv za zagon ne odpre, pritisnite tipki Ctrl + Shift + Esc, da zaženete upravitelja opravil sistema Windows, kliknite Start> Zaženi novo opravilo . V odprto polje vnesite PowerHell in nato potrdite polje »Ustvari to nalogo s skrbniškimi pravicami« in kliknite V redu .
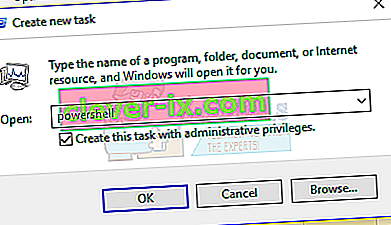
- V okno Powershell prilepite naslednji ukaz in pritisnite Enter:
Get-AppXPackage -AllUsers | Foreach {Add-AppxPackage -DisableDevelopmentMode -Registriraj “$ ($ _. InstallLocation) \ AppXManifest.xml”}. - Po tem bi morala biti vaša opravilna vrstica popolnoma funkcionalna.

4. način: Omogočite upravitelja uporabnikov
Onemogočeni upravitelj uporabnikov lahko povzroči zamrznjeno opravilno vrstico sistema Windows 10. Poskusite znova omogočiti upravitelja uporabnikov s temi koraki.
- Pritisnite tipko Windows + R , vnesite services.msc in kliknite V redu . To odpre servisno konzolo.
- Poiščite User Manager in ga dvokliknite.
- Nastavite vrsto zagona na Samodejno in zaženite storitev, če je bila ustavljena. Kliknite V redu .

- Znova zaženite računalnik in opravilna vrstica bi trenutno morala popolnoma delovati.

5. način: Odstranite programe
Nekateri uporabniki so prepoznali nekatere programe, zaradi katerih je opravilna vrstica delovala pravilno. To sta Dropbox in Classic Shell . Če sumite, da to povzroča katera koli aplikacija, jo lahko tudi odstranite.
- Pritisnite tipki Windows + R, da odprete poziv za zagon. Vnesite appwiz. cpl in pritisnite Enter .
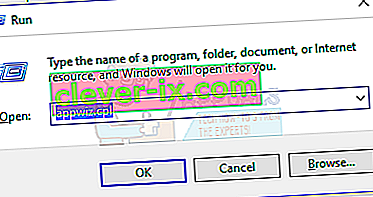
- Poiščite aplikacijo na seznamu nameščenih aplikacij in jo dvokliknite. Zdaj sledite navodilom za dokončanje odstranitve.
- Znova zaženite računalnik in nato preverite, ali opravilna vrstica zdaj pravilno deluje.

6. način: Onemogočanje nedavno odprtih elementov
Pred kratkim odprti predmeti lahko upočasnijo uvajanje seznama. Če jih onemogočite, je to hitrejše in preprečuje zamrznitev. Sledite tem navodilom, da onemogočite nedavno odprte predmete.
- Pritisnite Win + I, da odprete aplikacijo Nastavitve.
- Pomaknite se do Prilagajanje> Začni
- Potisnite gumb za preklop poleg možnosti Pokaži nedavno odprte elemente na seznamih za skok na Start ali v opravilni vrstici, da ga izklopite.

- Ob naslednjem ponovnem zagonu se opravilna vrstica ne sme zamrzniti

7. način: ponastavite privzete storitve Windows 10
Če v tem trenutku nobena od zgornjih metod ni delovala, poskusite zagnati ta skript kot skrbnik, tako da ga kliknete z desno miškino tipko in izberete Zaženi kot skrbnik . Če iz nekega razloga vaš WiFi ne deluje več, sledite korakom tukaj (pri 3. metodi - 2. korak: 2. možnost), da odpravite težavo z WiFi.
8. način: Ustvarite nov uporabniški račun
V nekaterih primerih se napaka lahko sproži, če nastavitve ali konfiguracije vašega uporabniškega računa niso bile pravilno nastavljene in tudi če je v teh konfiguracijskih podatkih poškodovana. Zato lahko kot drugo možnost poskusite ustvariti nov uporabniški račun v računalniku z operacijskim sistemom Windows 10 in nato pozneje uvozite podatke iz starejšega računa, če odpravi težavo. Če želite to narediti:
- Pritisnite “Windows” + “I”, da odprete nastavitve, in kliknite možnost “Računi” .
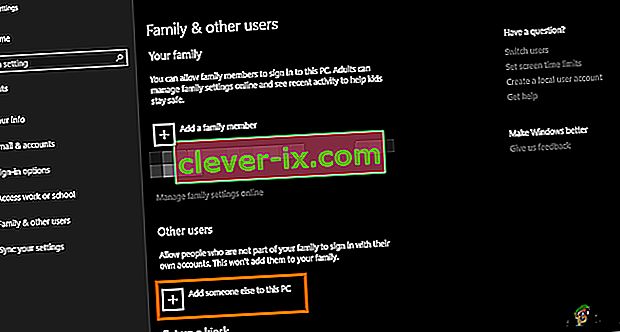
- V možnosti računi na levi strani kliknite gumb »Družina in drugi uporabniki« .
- V meniju izberite možnost » Dodaj nekoga drugega v ta računalnik «.
- V naslednjem oknu kliknite gumb » Nimam podatkov za prijavo te osebe «.
- V novem oknu, ki se odpre, kliknite možnost »Dodaj uporabnika brez Microsoftovega računa« .

- Vnesite uporabniško ime uporabniškega računa in mu dodelite geslo.
- Vnesite varnostna vprašanja, odgovorite nanje in kliknite možnost »Naprej« .
- Po ustvarjanju tega računa kliknite nanj in nato izberite možnost »Spremeni vrsto računa« .
- Kliknite spustni meni »Vrsta računa« in nato izberite možnost »Skrbnik« .
- Shranite spremembe in se prijavite v ta račun.
- Po prijavi v račun zaženite Steam in preverite, ali igra teče.


Če s tem odpravite težavo v računalniku, uvozite podatke uporabniškega računa iz prejšnjega računa v tega novega in jih še naprej uporabljajte normalno.
9. način: Diagnosticiranje v varnem načinu
Včasih ste v računalnik morda namestili nekatere programe drugih proizvajalcev, ki vam morda preprečujejo pravilno zagon opravilne vrstice ali z njo povezanih storitev. Poleg tega je mogoče, da celo Windows ali Microsoftova storitev preprečuje pravilno delovanje računalnika. Zato bomo v tem koraku diagnosticirali to težavo v varnem načinu in nato preverili, ali jo je mogoče odpraviti. Za to:
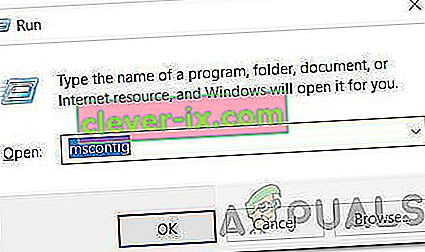
- Pritisnite “ Windows” + “ R”, da zaženete poziv za zagon.
- Vnesite » MSCONFIG« in pritisnite » Enter«, da zaženete Microsoftovo konfiguracijsko okno.
- V tem oknu kliknite zavihek »Storitve « in počistite polje »Skrij vse Microsoftove storitve«
- Ko počistite to možnost, kliknite gumb »Onemogoči vse« in kliknite »Uporabi«, da shranite spremembe.
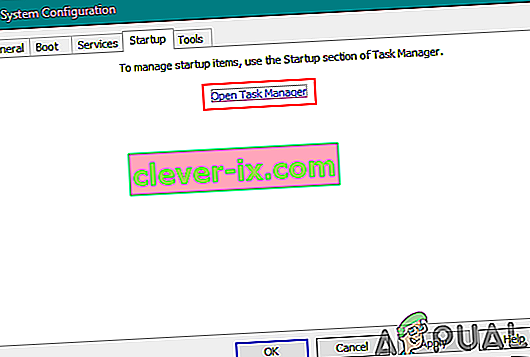
- Po tem kliknite zavihek »Zagon « in nato gumb »Odpri upravitelja opravil«, da zaženete upravitelja opravil.
- V upravitelju opravil kliknite na vsako omogočeno aplikacijo in nato na gumb »Onemogoči«, da se prepreči zagon ob zagonu.
- Znova zaženite računalnik, da se zdaj zažene v varnem načinu.
- V varnem načinu preverite, ali vam opravilna vrstica po določenem času ali celo ob zagonu zamrzne.
- Če se opravilna vrstica v tem načinu ne zamrzne, to pomeni, da je težavo povzročila neodvisna aplikacija ali storitev.
- Začnite omogočiti programe enega za drugim in preverite, pri katerem se težava vrne.
- Če so vse aplikacije v redu, začnite omogočiti storitve eno za drugo in preverite, pri kateri se težava vrne.
- Problematično storitev / aplikacijo onemogočite ali jo poskusite znova namestiti / posodobiti.


10. način: Obnovitev sistema
Nekateri uporabniki so ugotovili, da je preprosta obnovitev prejšnjega delovnega datuma odpravila težavo, vendar boste morali skrbno izbrati obnovitveno točko, na katero boste obnavljali. Priporočljivo je, da ta postopek namesto samodejnega obnavljanja opravite ročno. Če želite izvesti ta korak, sledite spodnjim navodilom.
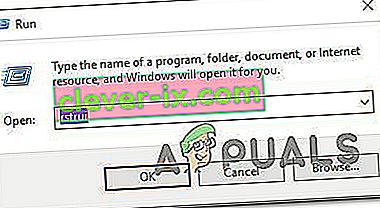
- Pritisnite “Windows” + “R”, da odprete poziv za zagon.
- Vnesite "rstrui" in pritisnite "Enter", da odprete okno za upravljanje obnovitve.
- Kliknite »Naprej« in označite možnost »Pokaži več točk za obnovitev« .
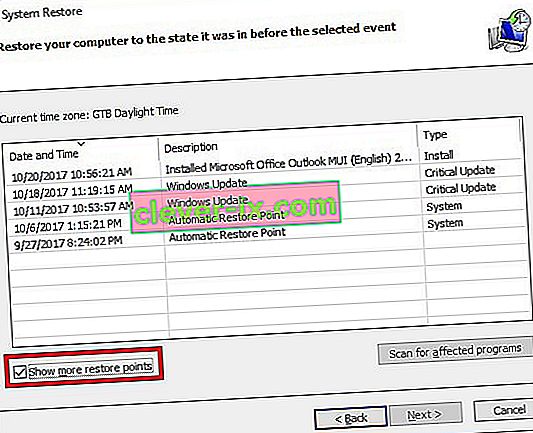
- Na seznamu izberite obnovitveno točko, ki je starejša od datuma, ko se je ta težava začela pojavljati v vašem računalniku.
- Znova kliknite »Naprej« in sledite navodilom na zaslonu, da obnovite vse nazaj na datum, ki ste ga izbrali v oknu za obnovitev.
- Preverite, ali s tem odpravite težavo z zamrznjeno opravilno vrstico.


11. način: preklop sistemskih ikon
V nekaterih primerih je možno, da se nastavitev sistemske ikone v računalniku pokvari, zaradi česar se ta težava sproži. Zato bomo v tem koraku preklapljali med temi ikonami in nato preverili, ali s tem odpravljamo težavo. Za to:
- Pritisnite “Windows” + “I”, da odprete nastavitve, in kliknite možnost “Personalizacija” .
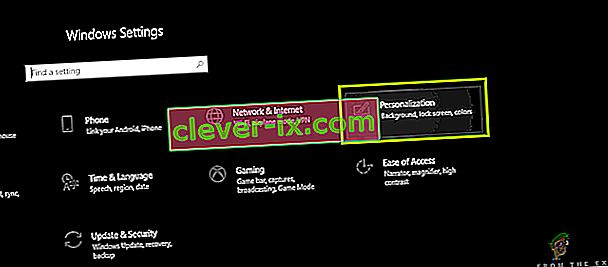
- Na levi strani kliknite gumb »Opravilna vrstica« .
- Pod naslovom »Območje za obvestila« kliknite gumb »Vklop ali izklop sistemskih ikon« .

- Vse ikone v naslednjem oknu preklopite eno za drugo tako, da jih za nekaj sekund izklopite in nato znova vklopite.
- Po končanem postopku se vrnite na namizje, tako da zaprete to okno.
- Preverite, ali je s tem težava odpravljena.


12. način: Zaženite orodje za odpravljanje težav z vzdrževanjem sistema Windows
Možno je, da je v računalniku nekaj ostankov datotek, zaradi katerih primanjkuje sistemskega pomnilnika za ostranjevanje ali če ostanejo bližnjice nekaterih aplikacij, kar lahko tudi prepreči pravilno delovanje opravilne vrstice. Zato bomo v tem koraku zagnali orodje za odpravljanje težav z vzdrževanjem sistema Windows in nato preverili, ali s tem odpravljamo to težavo. Za to:
- Press “Windows’ + “R” to open the Run prompt.
- Type in “Control Panel” and press “Enter” to launch the classical control panel interface.

- Click on the “View By:” option from the top and select the “Large Icons” option from the menu.
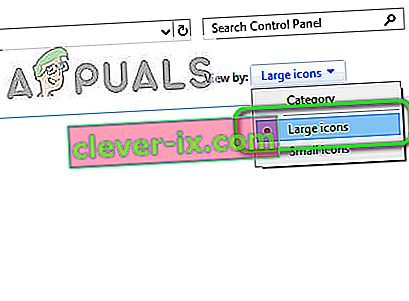
- In the next window, click on the “Troubleshooting” option and then click on the “Run Maintenance Tasks” button.
- In the window that pops up, click on the Next button, and provide administrative privileges to successfully run this task.
- Wait for the Maintenance to be completed and check to see if doing so has fixed the issue with the frozen taskbar.


Method 13: Use DDU to Perform a Clean Install
In some cases, it is possible that the Graphics Card installed on the system might have a faulty driver installed due to which this issue is being triggered. Therefore, in this step, we will be performing a Clean install of the Graphics Driver by uninstalling the Driver using DDU and then we will check to see if doing so has fixed the issue with the Taskbar. For that:
- Make sure to back up any important data before performing this step in case something goes unexpected.
- Download the DDU software from this website.
- After downloading the software, extract the zip file and open the folder where it has been extracted.
- Run the “.exe” file inside the folder and it will automatically further extract inside the same folder.
- Open the newly extracted folder and click on the “Display Driver Uninstaller.exe”.
- Click on the “Select Device Type” dropdown and select “GPU”.
- In the other dropdown, select the manufacturer of your GPU and then click on the “Clean and do not Restart” option.
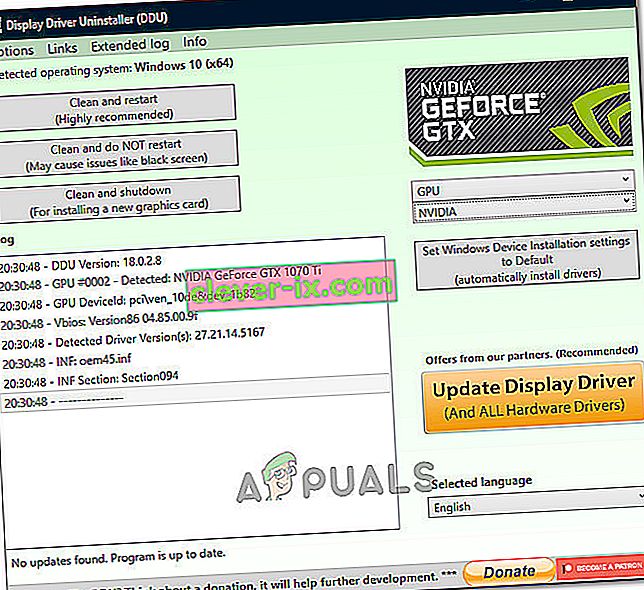
- This will uninstall the device driver for your GPU and it should automatically shift to the Microsoft Basic Visual Adapter.
- After uninstalling this software, download the GPU driver from your manufacturer’s website by specifying your exact make and model.
- Install this software on your computer and then check to see if doing so fixes the taskbar freezing issue on your computer.

Method 14: Stopping Windows Service
In some situations, it is possible that a certain Windows service might need to be stopped from the task manager. Therefore, in this step, we will be preventing it from running in the background as it has likely hanged due to which the taskbar is being frozen. In order to stop this service:
- Press “Windows’ + “R” to open the Run prompt.
- Type in “taskmgr” and press “Enter” to open the Task Manager.
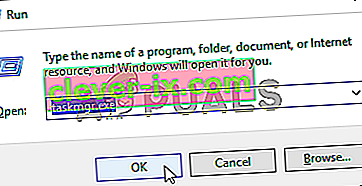
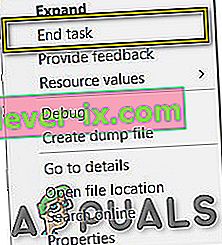
- Click on the “Processes” tab and from the list, click on the “Service Host: DCOM Server Process Launcher” service.
- Click on the “End Task” button and close out of the task manager.
- After closing out of the task manager, check to see if doing so has fixed the frozen taskbar situation.

Method 15: Stop Microsoft Edge and Remove it from Taskbar
In some situations, the default browser that comes installed with Microsoft Windows might just be the culprit behind this whole issue. If you are using another browser as your go-to default browser, you might see that using the Microsoft Edge browser causes issues with the taskbar. Therefore, in this step, we will be stopping Microsoft Edge from the Task Manager and then we will remove it from the taskbar. For that:
- Press “Windows’ + “R” to lauch the Run prompt.
- Type in “taskmgr” and press “Enter” to open the Task Manager.
- Click on the “Processes” tab and from the list, click on the “Microsoft Edge” browser.
- Click on the “End Task” button and close the task manager.
- If the Taskbar is still frozen, restart your computer and repeat this process.
- After doing so, right-click on the Microsoft Edge icon in the taskbar.
- Select the “Unpin from Taskbar” option to remove Microsoft Edge from your taskbar.
- Check to see if doing so fixes the issue.

Method 16: Remove Outdated References
It is possible that your Registry might be plagued with outdated references to an old operating system that you might’ve upgraded from. Even if you have removed the Windows.old folder from your computer, some driver and registry files might still be associated with the “Windows.old” folder which practically doesn’t exist on your computer and this misconfiguration might prevent your computer from working properly. Therefore, in this step, we will be removing it from the registry editor. For that:
- Press “Windows’ + “R’ to open the Run prompt.
- Type in “regedit” and press “Enter” to open the registry editor.
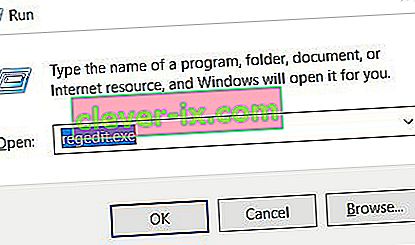
- Press “Ctrl” + “F” to open the finder and type in the “c:\windows.old” line and press “Enter” to find any registry related entries.
- Delete or remove any such entries that refer to this and run an SFC scan to check for any missing files.
- Make sure to install any missing drivers using Driver Easy and then check to see if the Frozen Taskbar issue has been fixed.

Method 17: Rollback Updates
In some situations, Windows might’ve acquired some updates that are preventing your computer from functioning properly and due to this, the taskbar feature has been broken. Therefore, in this step, we will be rolling back some recently installed updates and then we will check to see if doing so fixes the frozen taskbar issue. In order to do that:
- Press “Windows’ + “I” buttons on your keyboard to open the Windows settings.
- In the Windows Settings, click on the “Update and Security” button and from the left pane, select “Windows Update”.
- On the next screen, select the “Update History” button and it should lead to a new window.
- In the new window, there should be an “Uninstall Updates” button and by clicking on it, a prompt should open that should enable you to be able to uninstall an update.
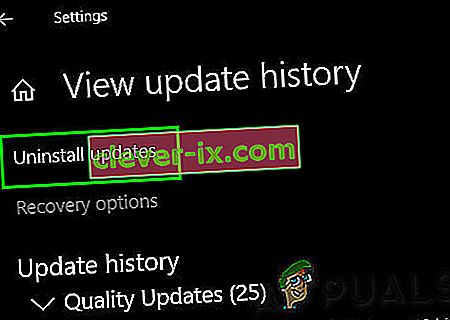
- Follow the on-screen instructions to be able to fully remove the update and check to see if the issue persists after doing so.


Method 18: Signing out of Account
It is possible that the Windows Taskbar is getting frozen due to a glitch during the account login. Therefore, we can test this out by simply signing out of our account and then signing back in to ensure that the account is logged in properly and that it is properly registered with the Microsoft Servers. In order to do so:
- Press “Ctrl” + “Alt” + “Del” buttons on your keyboard to open up the account options.
- Click on the “Sign out” option from the screen to log out of your account.
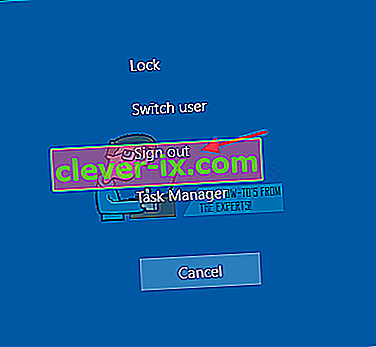
- Wait for Windows to completely sign you out of your account and confirm any prompts on your screen to complete the sign-out process.
- Select your account and sign back into your account from the next screen by entering your login details.
- Check to see if doing so has fixed the frozen taskbar issue on your account.

Method 19: Creating Batch File
Most people found that restarting the Windows Explorer fixed their issue but for some of them, it kept coming back after a while. Therefore, in this step, we figured out a way for the people that can solve it by restarting but all they will have to do is click on a batch file present on their desktops. For that:
- Right-click anywhere on your desktop and select the “New>” option.
- Click on the “Text Document” option and a new text document will be created on your desktop.
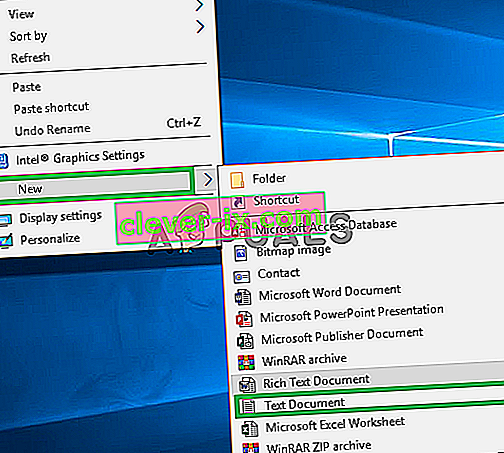
- Open this text document and paste the following lines inside of the text document.
taskkill /f /IM explorer.exe start explorer.exe exit
- Click on the “File” option at the top left of the window and select the “Save As” option.
- Enter the “TaskMRestart.bat” as the file name and select “All Files” from the “File Type” dropdown.
- Save this file on your desktop and exit out of the document.
- Now, double-clicking on this newly saved file should automatically restart File Explorer which should fix the Frozen taskbar issue within a second.
- You can just click on the file whenever the taskbar freezes and it should fix itself.

Method 20: Perform an Update
The frozen taskbar issue was a very famous topic on most Microsoft forums and apparently a lot of Microsoft officials took note of it. Therefore, it is possible that this issue might’ve been fixed for some people in recent updates released by Microsoft. Therefore, in this step, we will be checking for any available updates from Microsoft and installing them on our devices. For that:
- Press “Windows” + “I” to open the settings.
- In the settings, click on the “Update and Security” option and then select the “WindowsUpdate” button from the left side.
- In the Windows Update, click on the “Check for Updates” button and a prompt will be registered that will automatically check for any newly available updates.
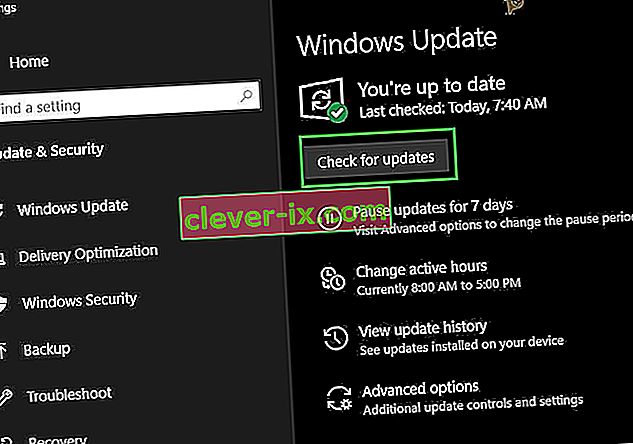
- Install these updates on your computer by following the on-screen instructions and restart your computer.
- Check to see if installing these updates fixes the issue on your computer.

Method 21: Unpinning Items from Start Menu
Some people like to pin important items to the start menu for ease of access and increased productivity. However, as it stands, some Windows users have been facing the frozen taskbar issue due to these pinned items. Therefore, in this step, we will be unpinning some items from the start menu and the taskbar and then we will check to see if doing so fixes the frozen taskbar bug.
- Press the “Windows” button on your keyboard to launch the start menu.
- Inside the start menu, right-click on a tile on the right side of the start menu.
- Select the “Unpin from Start Menu” button to remove the item from the Start menu tiles.
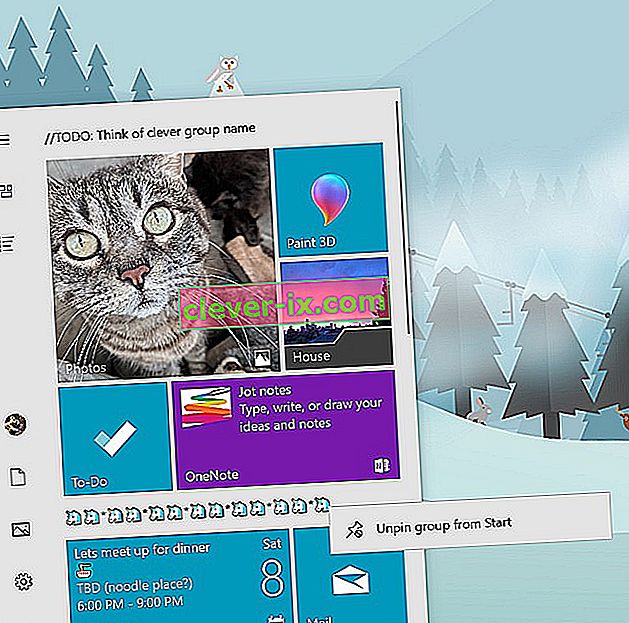
- After removing some items, check to see if the bug is fixed.
- Try removing all the items that can be removed if the bug comes back and check again.
- For a more accurate removal, try removing all the programs from the taskbar and the Start menu that try to connect to the internet, for example, Microsoft Edge, Cortana, News, etc.

Method 22: Disable Items from Bios
It is possible in some cases that the computer’s Bios has been improperly configured due to which the Windows Taskbar is getting frozen time and time again. Therefore, in this step, we will first be booting inside the Bios from which we will disable an option that should get rid of this problem if it was based around the Bios. In order to do so:
- Pritisnite tipko “Windows” na tipkovnici in kliknite ikono “Power Button” .
- Na seznamu izberite možnost »Ponovni zagon« in počakajte, da računalnik zahteva ponovni zagon.
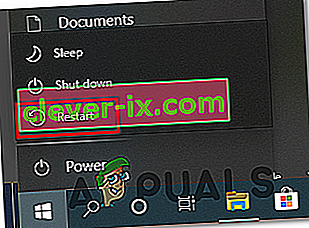
- Ko se računalnik izklopi in začne zaganjati računalnik, začnite pritisniti tipko “Del”, “F12” ali “F11”, odvisno od vaše matične plošče, da se zaženete v računalniku.
- Od bios, krmariti skozi različne nastavitve, dokler ne najdete "iGPU Multi-Monitor" funkcijo.
- Onemogočite to funkcijo v Biosu in se znova zaženite v sistem Windows.
- Preverite, ali je onemogočanje te funkcije delovalo, in odpravite napako zamrznjene opravilne vrstice.


